


When managing high-priority Salesforce cases, delays caused by manual workspace setup can slow down response times and reduce efficiency. Automating the creation of Microsoft Teams workspaces for Salesforce cases solves this problem by instantly generating tailored collaboration spaces. Platforms like nFlow simplify this process, automatically setting up channels, templates, and notifications based on case details like priority or type.
Here’s how it works:
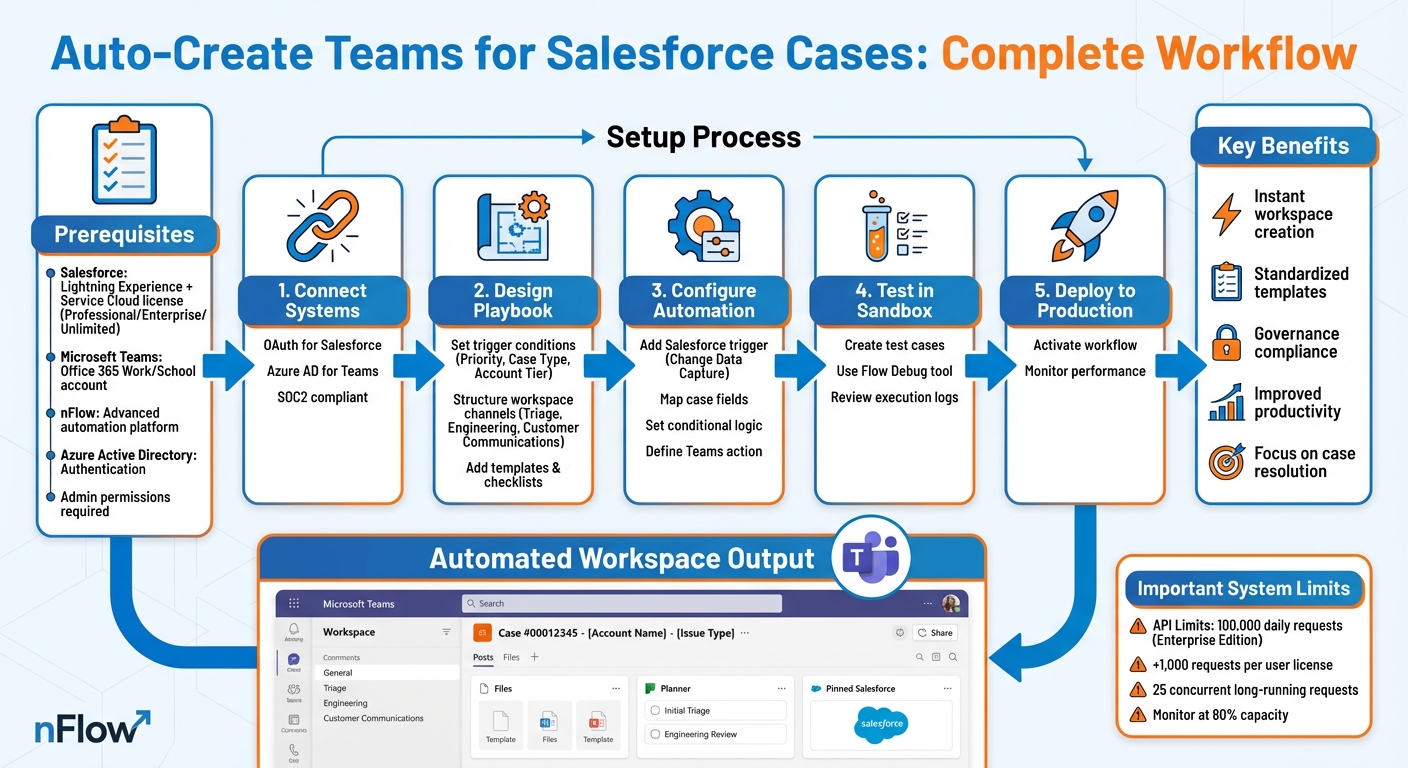
- Trigger-based Automation: Salesforce case fields (e.g., Priority, Case Type) trigger Teams workspace creation.
- Customized Workspaces: Predefined templates include channels for triage, engineering, and customer communication.
- Integration Tools: nFlow connects Salesforce and Teams, streamlining collaboration without manual effort.
- Governance Compliance: Automation adheres to Microsoft 365 policies for naming, access, and lifecycle management.
With this setup, service teams can focus on resolving cases instead of managing tools, saving time and improving productivity.
How to Automate Teams Workspace Creation for Salesforce Cases
Prerequisites and Platform Requirements
To automate Teams workspaces for Salesforce cases, you’ll need the proper platforms, licenses, and admin access. Here’s what you’ll need to get started.
Required Tools and Licenses
On the Salesforce side, you’ll need Salesforce Lightning Experience with a Professional, Enterprise, or Unlimited Service Cloud license. Your Salesforce admin must have administrative permissions and assign the "Teams Integration" permission sets to users who will work with the integration.
For Microsoft Teams, an Office 365 Work, School, or higher account with Microsoft Teams enabled is required. Microsoft 365 includes Power Automate for basic workflows. However, for advanced automation – such as creating case-specific channels, pre-loading file templates, and pinning Salesforce records as tabs – you’ll need a platform like nFlow, which is specifically designed to operationalize Salesforce playbooks in Teams.
While the free Salesforce for Microsoft Teams app supports basic collaboration, it doesn’t provide the automation needed for creating case-specific workspaces. This is where nFlow comes in.
Additionally, you’ll need Azure Active Directory for authentication between Microsoft 365 and external integrations.
Once you have the tools and licenses in place, ensure your security and admin permissions are properly configured to safeguard the integration.
Admin Permissions and Security Setup
Automation requires strict permissions and security protocols. Start by setting up a dedicated integration user in Salesforce specifically for nFlow. Assign this user the Salesforce Integration license to grant API-only access.
Follow the principle of least privilege: limit unnecessary permissions from the default profile and use permission sets to grant only the required object and field-level access for nFlow – typically Read/Edit access on objects like Case, Account, and Contact. Additionally, restrict the integration user’s login to nFlow’s approved IP addresses.
For Salesforce Flows that drive nFlow automation, your Salesforce admin will need the "Manage Flows" permission. Users who will run these Flows require the "Run Flows" permission or a "Flow User" license. Be cautious when assigning these permissions – avoid granting them to low-privileged or external users.
On the Microsoft Teams side, your Microsoft 365 admin must authorize the nFlow integration and configure appropriate access policies.
System Limits and Integration Constraints
Salesforce imposes API rate limits that impact any automation platform, including nFlow. Enterprise Edition organizations start with 100,000 daily API requests, plus 1,000 additional requests per user license. These limits operate on a rolling 24-hour window rather than calendar days.
For environments with high case volumes, closely monitor API usage. Salesforce caps concurrent long-running API requests (those exceeding 20 seconds) at 25 for production orgs. If you’re handling large data operations, the Bulk API allows up to 15,000 batch submissions per day, with each batch limited to 10,000 records and a 10MB payload.
To avoid hitting hard limits during peak times, such as month-end reporting, set alerts when usage reaches 80% of capacity. While nFlow is designed to work within Salesforce’s API limits, understanding your organization’s overall API consumption across integrations is crucial to prevent bottlenecks. If you’re using Salesforce Connect for external data, remember that it supports a maximum of 100 external objects per organization and limits queries to 4 joins per query.
Designing Service Playbooks for Teams Creation
A thoughtfully crafted playbook can turn case management into a smooth, structured collaboration process. By planning out workspace elements, timing, and content ahead of time, you can set the stage for automation that works seamlessly.
Setting Trigger Conditions in Salesforce Cases
Start by defining trigger conditions based on Salesforce case fields like Priority, Case Type, Account Tier, and SLA.
For instance, you could automatically initiate Teams creation when a case meets specific criteria, such as Priority = High and Account Tier = Enterprise, or when Case Type = Security Incident, regardless of other details. These field-based triggers ensure that only cases needing focused collaboration result in new workspaces, keeping things organized and avoiding unnecessary clutter.
For more complex scenarios – like determining whether an account has an active contract or analyzing multiple related objects – you’ll need Apex Triggers instead of declarative tools. That said, for most service teams, the standard Salesforce case fields provide enough flexibility to route cases effectively.
Once you’ve nailed down the triggers, you can design Teams workspaces that align perfectly with the criteria you’ve set.
Structuring Teams Workspaces for Cases
Your Teams workspaces should mirror your team’s workflow. A common setup might include dedicated channels for specific collaboration needs:
- Triage for initial case assessment and severity evaluation
- Engineering for technical investigations and root cause analysis
- Customer Communications for managing external updates
For example, the Triage channel can focus on evaluating and prioritizing the case, while Engineering becomes the central hub for troubleshooting. Meanwhile, the Customer Communications channel ensures all external messaging is consistent and pre-approved.
Dynamic naming is key to avoiding confusion, especially when team members are part of multiple workspaces. Instead of generic labels, use Salesforce data to create descriptive workspace titles like "Case #00012345 – [Account Name] – [Issue Type]". This approach makes it easy for everyone to immediately understand the context of each workspace.
Adding Templates and Checklists
With your workspace structure in place, you can enhance it by adding standardized templates and checklists. Pre-loading workspaces with essential resources – like file templates, task lists, and reference documents – saves time and ensures consistency. Tools like nFlow can automate this process, populating new workspaces with everything your team needs based on the playbook configuration.
For high-priority incidents, this might include:
- An RCA (Root Cause Analysis) document template
- A customer communication guidelines file
- A Planner tab with a checklist covering investigation steps, stakeholder notifications, and resolution verification
These resources eliminate the need for team members to search for materials or rely on memory for procedural steps.
Salesforce Action Plan Templates can also help by defining reusable task sequences with assigned roles, dependencies, and priorities. nFlow takes it a step further by translating these Salesforce playbooks into actionable checklists within Teams. This ensures every case of the same type is handled with the same level of precision and care.
Setting Up Automation with nFlow
Once your playbook is ready, the next step is setting up automation to bring it to life. With nFlow’s no-code platform, connecting Salesforce and Teams, configuring automation rules, and testing the setup is a straightforward process.
Connecting Salesforce and Microsoft Teams to nFlow
The first step is to establish secure connections between nFlow, Salesforce, and Microsoft Teams. nFlow uses OAuth for Salesforce authentication and Azure AD for Teams integration, ensuring all data transfers are encrypted. The platform meets SOC2 compliance standards and, for hosted plans, stores data securely on servers in Frankfurt, Germany.
To get started, navigate to the Workflows tab and click "Add workflow" to create a new workflow in nFlow. You’ll then authenticate both Salesforce and Teams – Salesforce through OAuth and Teams through Azure AD – granting nFlow the necessary permissions to create workspaces and sync data. Once the connection is set up, it remains securely established.
Creating Automation Rules in nFlow
After connecting your systems, the next step is to set up automation rules. Begin by adding a Salesforce trigger using Change Data Capture (CDC). This trigger listens for Salesforce case events and initiates workspace creation in real time.
Next, configure a data mapping task to align key case fields. Add conditional logic to ensure workspaces are only created under specific conditions. For instance, you could set rules to create a Teams workspace only when Case Type = "Problem" or when the associated account meets criteria like Annual Revenue ≥ $20,000,000 or Employees ≥ 5,000.
Finally, define the Microsoft Teams action to create the workspace. Use Salesforce data dynamically to name workspaces – for example, "Case #00012345 – [Account Name] – [Issue Type]" – and apply the appropriate template. nFlow will pre-load the workspace with the channels, folders, file templates, and checklists outlined in your playbook. Once everything is configured, save and activate the workflow to make it operational.
Testing Automation in Sandbox
Before going live, test your automation in a Salesforce sandbox. This isolated environment allows you to experiment without impacting live data or disrupting active cases. Create test cases that reflect real-world scenarios, covering a range of case types, priority levels, and account tiers, to ensure your automation handles all situations effectively.
Use Salesforce’s Flow Debug tool to simulate and verify the automation’s behavior. Check that workspace configurations align with your playbook and review execution logs to spot any issues with data mapping or logic. Once you’re confident everything works as intended in sandbox, you can deploy the automation to production, knowing it will handle live cases seamlessly.
sbb-itb-95f1422
Managing and Optimizing Automated Workspaces
Once you’ve set up automation, the next step is managing and fine-tuning it to keep everything running smoothly. Automation isn’t a "set it and forget it" deal – it requires ongoing monitoring and adjustments to stay aligned with your business goals and deliver consistent results.
Aligning with Microsoft 365 Governance Policies
Governance is all about balancing productivity with security and compliance. It’s important to establish clear rules, like naming conventions and access controls, to keep things organized and secure.
nFlow integrates seamlessly with your existing Microsoft 365 governance framework. When it creates Teams workspaces based on Salesforce cases, it adheres to the naming conventions, access settings, and lifecycle policies you’ve already defined. By automating workspace creation through Salesforce-driven rules, rather than allowing ad-hoc team creation, you maintain consistency and avoid the clutter of unnecessary workspaces that often result from manual processes.
Tracking and Improving Automation Performance
Keeping an eye on your automated workspaces means regularly checking both the Salesforce triggers and the integration layer that generates Teams workspaces. Application Performance Monitoring (APM) tools are invaluable here – they help you spot potential issues before they disrupt your workflow. Key metrics to monitor include workspace creation time, trigger success rates, and error logs. These insights can reveal bottlenecks or misconfigurations that need attention.
It’s also essential to analyze usage patterns. For instance, if you notice that workspaces for cases with an annual revenue of less than $50,000 are rarely used, you might want to adjust the threshold to focus automation on higher-value cases. This approach keeps your Teams environment streamlined and ensures that automation is genuinely impactful. Use this data to tweak your templates, refine trigger conditions, and update your playbooks to better align with actual usage.
Updating Service Playbooks Over Time
Service workflows evolve, and your playbooks should evolve with them. Regularly review and update playbooks using sandbox tests and debugging tools to address changing needs [49–52]. Document every update to maintain consistency with your original strategy [49–52]. For easier maintenance, consider breaking down complex automation into smaller, reusable subflows [49–52]. Also, incorporate fault paths to handle errors gracefully [49–52].
A good rule of thumb is to avoid hardcoding record IDs. Instead, use dynamic queries to keep your automation flexible and adaptable across different environments [49–52]. This forward-thinking approach ensures your playbooks remain effective and easy to manage as your processes grow and change.
Conclusion: Streamline Case Collaboration with Automation
Automating the creation of Teams workspaces for Salesforce cases eliminates unnecessary delays for service teams. Instead of manually setting up channels or searching for files, nFlow instantly provides a standardized workspace as soon as a case matches your criteria. This streamlined process ensures your service operation runs more smoothly and efficiently.
Relying on manual workflows often wastes time and increases the risk of errors. The lack of integration between communication tools and CRM systems creates bottlenecks that slow down your team. Automation solves this by seamlessly generating collaboration spaces, sending notifications, and updating records – all without manual intervention. This allows your team to focus on what matters most: resolving customer issues.
With nFlow, Salesforce events are transformed into fully configured Teams workspaces. Each case room is automatically set up with uniform folders, templates, and checklists tailored to your playbook strategy. Stakeholders, including those without Salesforce access, can immediately tap into the right channels, file templates, tasks, and checklists – all without switching platforms. While governance and lifecycle policies remain aligned with your Microsoft 365 setup, the true advantage lies in improved execution: quicker responses, fewer missed steps, and a scalable, well-organized Teams environment that evolves with your business.
FAQs
What are the main advantages of using nFlow to automate Teams workspaces for Salesforce cases?
Using nFlow takes the hassle out of managing your workflows by automatically setting up Teams workspaces whenever specific Salesforce events occur. This means no more manual configuration – each workspace is consistently organized, comes with pre-loaded content, and integrates seamlessly with Salesforce data.
With everything your team needs – tools, files, and updates – conveniently in one place, nFlow helps you save time, minimize mistakes, and work more effectively. It’s a smart way to put your playbooks into action so your team can concentrate on execution instead of setup.
How does nFlow help maintain compliance with Microsoft 365 governance policies?
nFlow works hand-in-hand with Microsoft 365 governance policies by automating workflows that align with your organization’s security and compliance requirements. It takes care of lifecycle management, data protection, and workspace oversight while sticking to established best practices to keep operations smooth and efficient.
By seamlessly integrating with Microsoft 365, nFlow ensures that every Teams workspace generated from Salesforce events adheres to your organization’s policies. This happens without creating extra challenges or complexity for your IT teams, keeping things simple and effective.
What do I need to set up nFlow for integrating Salesforce and Microsoft Teams?
To get started with nFlow for integrating Salesforce and Microsoft Teams, you’ll need a few things in place. First, ensure you have a Salesforce Lightning Experience environment with a Sales Cloud license. Next, you’ll need an Office 365 work or school account with Teams enabled. Finally, make sure the Salesforce app is installed in Teams.
Don’t forget to configure the required permissions in both Salesforce and Teams. This step is crucial for ensuring the integration runs smoothly. With these prerequisites set up, nFlow can automate the creation of Teams workspaces based on your Salesforce workflows.
Leave a Reply