

No-code workflows simplify case management by automating repetitive tasks like creating Microsoft Teams workspaces, routing cases, and notifying stakeholders. Using tools like Salesforce Flow Builder and nFlow, teams can design automated processes without coding expertise. This approach ensures every case follows a standardized process, reducing delays and errors while improving efficiency. Here’s what you need to know:
- What They Are: No-code workflows use drag-and-drop tools to automate processes between platforms like Salesforce and Microsoft Teams.
- Why They Matter: Automation saves time, ensures consistency, and allows service teams to focus on resolving cases instead of handling manual tasks.
- How They Work: Triggers in Salesforce (e.g., status changes) can automatically create Teams workspaces, assign tasks, and notify relevant team members.
- Tools Needed: Salesforce Service Cloud, Microsoft Teams, and integration tools like nFlow.
Salesforce Flow Builder Complete Guide: Automate Business Processes Without Code part 1
Mapping Your Case Management Playbook
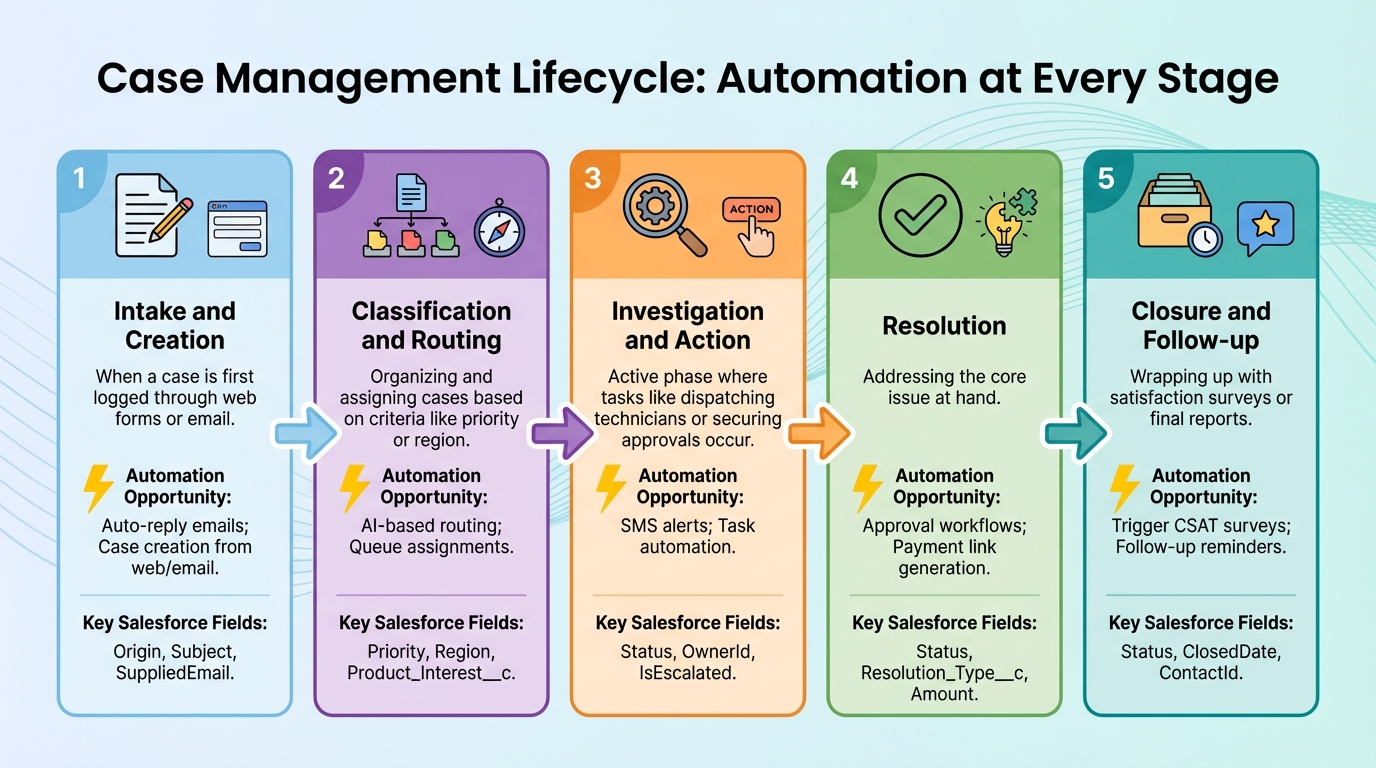
5-Stage Case Management Lifecycle with Automation Opportunities
Transform your case management playbook into a clear, actionable guide for automation. This involves outlining how cases flow through your organization, identifying the data points that trigger actions, and standardizing the workspace setup for different case types. This blueprint will serve as the foundation for integrating Salesforce, Teams, and nFlow in the next steps.
Defining Key Case Lifecycle Stages
Break down your case lifecycle to pinpoint where automation can replace manual processes. Most case management playbooks include five main stages:
- Intake and Creation: When a case is first logged, often through web forms or email.
- Classification and Routing: Organizing and assigning cases based on criteria like priority or region.
- Investigation and Action: The active phase where tasks like dispatching technicians or securing approvals occur.
- Resolution: Addressing the core issue at hand.
- Closure and Follow-up: Wrapping up with satisfaction surveys or final reports.
Each stage offers opportunities to streamline workflows. For instance, when a case status changes from "New" to "Escalated", automation can create a Microsoft Teams workspace, notify key stakeholders, and assign tasks – all without manual input. Here’s a quick look at how automation can enhance each stage:
| Lifecycle Stage | Automation Opportunity | Key Salesforce Fields for Triggers |
|---|---|---|
| New (Intake) | Auto-reply emails; Case creation from web/email | Origin, Subject, SuppliedEmail |
| Classification | AI-based routing; Queue assignments | Priority, Region, Product_Interest__c |
| In Progress | SMS alerts; Task automation | Status, OwnerId, IsEscalated |
| Resolution | Approval workflows; Payment link generation | Status, Resolution_Type__c, Amount |
| Resolved/Closed | Trigger CSAT surveys; Follow-up reminders | Status, ClosedDate, ContactId |
Start by visually mapping your current workflow, including decision points across teams and systems. This can help reveal bottlenecks or areas where information gets lost.
Identifying Key Fields for Automation
To automate effectively, identify the Salesforce fields that will trigger your workflows. These fields act as the "if/then" logic that tells the system when to take action. The most impactful triggers often fall into these categories:
- Status changes: For example, moving from "New" to "Escalated."
- Time-based thresholds: Such as cases left untouched for a specific period (e.g., 90 minutes).
- Segment-based triggers: Examples include "Account Tier" or "VIP Status".
"Identify what data is needed to start, orchestrate, and complete a workflow, and how various data sources drive the process from one step to the next." – MuleSoft
Focus on fields that signal meaningful progress in the case journey. For example, escalations, ownership changes, or time-sensitive updates are strong candidates. Analyze how much time manual steps currently take, and prioritize automating the steps that cause the biggest delays. Once these fields are defined, you’ll be ready to structure Teams workspaces for seamless case handling.
Planning Standardized Teams Workspaces
Create a consistent structure for Teams workspaces so that every case follows the same template. Decide which channels, folders, tasks, and stakeholders are essential for each case type. For instance, a high-priority technical issue might require channels for engineering, customer success, and product management, while a billing case might only need finance and support.
nFlow (https://nflowapp.com) simplifies this process by automatically generating Teams workspaces based on Salesforce triggers. For example, when a case meets specific criteria – such as "Priority equals High" and "Status equals Escalated" – nFlow creates a workspace with pre-set channels, file templates, and tasks. It also pins the Salesforce case record as a tab in Teams and keeps the team updated with smart notifications. This eliminates the need for manual setup, ensuring every workspace is ready to go with the same structure.
When planning your workspace templates, consider the needs of each case type. Define essential channels (e.g., "Case Discussion", "Internal Notes", "Customer Updates"), folders and file templates (e.g., troubleshooting guides, resolution documents), and task lists (e.g., "Collect diagnostic logs", "Schedule follow-up call"). Use modular subflows to handle reusable elements like channel creation or task assignment, making it easier to adapt as your playbook evolves.
Before rolling out, test your templates in a Salesforce sandbox to confirm the workspace structure works as intended. A well-designed playbook lays the groundwork for efficient, no-code automation in case management.
Setting Up Salesforce and Teams for No-Code Automation
Get Salesforce and Microsoft Teams ready to streamline case workspaces by setting up routing rules, preparing Teams templates, and connecting the two systems seamlessly.
Configuring Salesforce for Case Automation
Start by accessing Service Setup in Salesforce. Use the Quick Find search to locate essential automation tools like queues, assignment rules, escalation rules, and auto-response rules. These tools help prioritize and manage cases efficiently:
- Queues: For example, create a "Platinum Support" queue to ensure high-priority cases are shared among the right team members and surface automatically.
- Assignment Rules: Route cases to the correct person or queue based on criteria like case reason or priority [23, 24].
- Escalation Rules: Automatically flag cases that remain unresolved for a set time (e.g., escalate to management if untouched for five hours).
- Auto-Response Rules: Instantly send personalized email confirmations to customers when a case is created.
To ensure cases are always assigned properly, update the case page layout and keep the "Assign using active assignment rule" box checked.
For more advanced automation, turn to Salesforce Flow Builder, a visual tool that simplifies complex workflows without requiring code. Use Record-Triggered Flows to act on changes in case data (like status updates) or Autolaunched Flows to respond to external events. Test these flows using the Debug/Test features, and when integrating with external tools, set flow variables as "Available for input" [2, 5].
"A no-code approach to integration is really interesting since it makes a lot of functional IT work possible for a consultant who might be technical, but doesn’t necessarily have a background in, say, C sharp or Java or even Apex."
– Jacqui Park, Senior Salesforce Architect
Here’s a quick overview of the tools and their key setup steps:
| Tool | Primary Function | Key Configuration Step |
|---|---|---|
| Queues | Prioritize and share workloads | Add "Case" to Selected Objects and assign team members |
| Assignment Rules | Route cases to the right person | Define rule entries with specific criteria (e.g., Case Origin) |
| Escalation Rules | Manage SLAs and deadlines | Set time-based thresholds (e.g., case age) to trigger escalation |
| Auto-Response Rules | Send instant customer feedback | Select an email template and define entry criteria |
| Flow Builder | Custom, complex automation | Configure triggers (e.g., Record-Triggered) and add logic |
Once Salesforce is configured, shift your attention to setting up Microsoft Teams to complement these automated workflows.
Preparing Microsoft Teams for Automated Workspaces
Set up Microsoft Teams to host dedicated workspaces for collaboration and CRM integration. Start by defining clear naming conventions for case workspaces, such as "Case-[Case Number]-[Account Name]", to make them easy to identify. Implement governance policies that align with your Microsoft 365 setup. Decide who can create teams, how long workspaces should remain active, and establish archiving rules to avoid unnecessary clutter.
Identify the events that will trigger workspace creation – like changes in case status or priority. Then, decide on the structure of these workspaces, including channels, folders, and file templates for different case types. Once Teams is ready with standardized naming and governance, connect it to Salesforce for full automation.
Integrating Salesforce and Teams with nFlow
nFlow bridges Salesforce and Teams by automating workspace creation. For example, when a Salesforce case meets specific criteria (e.g., "Priority equals High" and "Status equals Escalated"), nFlow automatically generates a Teams workspace. This workspace comes pre-configured with channels, folders, templates, tasks, and pins the relevant case record. It also sends smart notifications to keep your team informed.
nFlow supports two-way integration, allowing updates to flow between Salesforce and Teams. For instance, you can send notifications or create workspaces from Salesforce, while also making CRM updates directly from Teams. With its no-code workflow builder, teams can set up rules and mappings without needing custom development.
Authentication is secured through Salesforce OAuth and Azure AD SSO, providing a unified identity across all platforms. Plus, nFlow respects your existing Microsoft 365 governance policies, so your service teams can focus on efficient execution without worrying about IT complexities.
sbb-itb-95f1422
Building No-Code Workflows for Automated Case Workspaces
Once your system is configured, the next step is to turn triggers into actionable workflows that automatically create dynamic team workspaces. These workflows ensure standardized case management and save time by automating repetitive tasks.
Defining Workflow Triggers
The first step is identifying the events that will trigger the creation of Teams workspaces. In Salesforce, Record-Triggered Flows can be used to define these triggers. To avoid unnecessary workspaces, set clear entry conditions. For instance, you might trigger workspace creation only when "Case Priority equals High" or "Case Type equals Product Support".
For time-sensitive cases, Escalation Rules can be effective. Ursa Major Solar, for example, uses a rule that automatically reassigns "Product Support" cases open for more than four hours to a Tier 2 queue while notifying senior staff. This ensures critical cases are addressed promptly without requiring constant manual oversight.
When integrating with external systems like Teams, use After-Save triggers to ensure the case is committed to the database before creating related records. For workflows that require periodic monitoring, such as identifying stagnant cases, Scheduled Flows can run every 24 hours. Before activating any trigger, take advantage of Flow Builder’s Debug tool to simulate events and confirm that your logic works as intended.
"Flow Builder empowers admins and business users to create powerful workflows with clicks instead of code… handling complex requirements without needing Apex or developers." – New Target Editorial Team
Once your triggers are in place, you can move on to automating workspace creation.
Creating Teams Workspaces from Salesforce Cases
After defining triggers, the next step is to configure workspace creation using tools like nFlow. When a case meets the specified criteria, nFlow automatically creates a Teams workspace. These workspaces come preloaded with standardized channels, folders, templates, and tasks, and they pin the Salesforce case as a tab for easy access. This setup allows team members to view case details, activities, and related records without switching between applications.
For example, you might design a "High-Priority Case" template with channels like "Customer Communication", "Technical Investigation", and "Resolution Planning." This approach ensures every case is handled consistently, regardless of the team member assigned to it.
RBC Wealth Management-U.S. offers a real-world example of the benefits of workflow automation. By automating their case management workflows, they reduced client onboarding time from several weeks to just 24 minutes. While their focus extended beyond Teams workspace creation, the principle is the same: automating manual steps speeds up processes and boosts team efficiency.
Configuring Notifications and Role-Based Participation
A workspace is only as effective as the people involved. To ensure the right team members are engaged, set up intelligent routing logic to assign cases based on factors like skill sets, priority, and workload. High-performing service teams often rely on AI-driven case routing, with 81% reporting improved accuracy through automated assignments.
Dynamic notifications in Teams can keep everyone informed without requiring constant monitoring of Salesforce. For instance, when a case status changes, priority escalates, or an SLA breach is imminent, nFlow can send notifications directly to the relevant Teams channel. These alerts include case details and actionable links, enabling team members to respond immediately from within Teams.
For cases requiring input from multiple departments, case swarming can be invaluable. This feature automatically adds specialists – such as product engineers, account managers, or technical leads – to the workspace based on case attributes like product category or customer tier. To ensure seamless collaboration, it’s essential that L1 and L2 teams maintain clear communication at every stage.
"L-1 is the go-between for the customer and L-2. They send information back and forth… That dynamic is so important. It needs to be flawless to work properly." – Tiffany Joseph, Senior Salesforce Consultant
Finally, set workflow variables to allow data – like expert comments or approval statuses – to flow back into Salesforce. This two-way integration keeps workflows aligned in real time as cases progress, eliminating the need for manual updates and completing the automation loop from trigger to resolution.
Governance and Optimization of Automated Workflows
Once you’ve set up automated case workspaces, the real work begins – ensuring they run smoothly through proper governance and ongoing adjustments to keep everything efficient.
Aligning with Case Management Best Practices
To get the most out of automation, keep Salesforce as your primary system of record while using Microsoft Teams for collaboration. This setup creates a unified, searchable history for audit trails and compliance purposes. Whenever team members collaborate within Teams workspaces, key updates – like status changes, priority escalations, and resolution notes – should automatically sync back to Salesforce.
Protecting sensitive information is also critical. Use role-based access control (RBAC) to ensure only the right people can access case details. For highly sensitive cases, apply detailed RBAC settings to meet regulatory requirements. At the same time, avoid overcomplicating workflows. Simplicity from the start is key, especially as organizations increasingly shift from traditional transactional processes to "case-oriented" approaches, incorporating document management, automation, collaboration, and analytics.
Implementing Governance and Lifecycle Policies
Consistency is everything when managing automated workspaces. Use a clear naming convention, like Case_High_00012345, to make it easy to identify workspaces as your system grows.
Another critical step is auto-archiving. Tools such as nFlow can automatically archive Teams workspaces once cases are resolved in Salesforce, adhering to your Microsoft 365 lifecycle policies. This keeps Teams organized by removing clutter while ensuring closed cases remain accessible for future reference. Make sure your data retention policies align with GDPR standards and configure auto-archiving to activate when cases close.
Pay close attention to the values used in your workflow triggers and outcomes. For instance, deleting or modifying a Salesforce picklist value tied to an active workflow can cause the automation to fail. To avoid this, document these dependencies and perform thorough governance checks before making changes to any custom fields or values that power your workflows.
Monitoring and Improving Workflows
Monitoring is essential to ensure your workflows keep up as case volumes grow. Always build and test in a Salesforce sandbox environment before deploying changes to production. Sandboxes let you simulate real-world data and test edge cases, ensuring workflows that handle 50 cases won’t crash when scaled to thousands.
Centralize error logging and use dashboards to track key metrics like SLA compliance, average resolution time, and first contact resolution. For example, if high-priority cases frequently breach SLA thresholds, it might be time to tweak routing logic or allocate more specialists to handle these cases.
For deeper troubleshooting, use tools like Flow Persistent Logging or create custom error objects triggered by Platform Events. These can log element run times and error details, making it easier to pinpoint and resolve issues. Aleksandra Radovanovic, Flow Product Manager at Salesforce, highlights the importance of this step:
"Documentation is often the last thing anyone wants to do, but it’s the critical element that separates maintainable enterprise systems from fragile, high-risk automation".
Finally, review your workflows quarterly to ensure they remain effective and relevant. As your processes evolve, make sure your automated workflows evolve with them.
Conclusion
No-code workflows are reshaping case management by breaking down technical barriers. They empower business users to design workflows independently, reducing dependence on IT teams and driving down operational costs. The outcome? Faster responses, consistent processes, and better teamwork across support teams.
This level of automation doesn’t just simplify operations – it keeps everyone on the same page. By automating Teams workspaces based on Salesforce events, context switching becomes a thing of the past. Team members gain real-time access to critical case details, ensuring smooth collaboration. Standardized playbooks provide a structured approach to high-priority cases, guaranteeing they’re handled with the same care and precision every time. This creates a reliable, trackable system that grows alongside your case volume.
Tools like nFlow take things even further. They transform Salesforce playbooks into fully functional Teams workspaces. When a case meets specific criteria – whether it’s an escalation, SLA breach, or particular case type – nFlow automatically generates a standardized Teams workspace. It even pins the relevant Salesforce record directly into the workspace, ensuring every case room operates with the same structure and workflow from the very beginning.
Looking ahead, the impact of no-code tools is only set to grow. By 2025, it’s predicted that 70% of new applications will rely on low-code or no-code platforms. Organizations already adopting these tools report 20% to 50% reductions in operational costs. For support teams managing hundreds or thousands of cases, this means fewer delays, clearer accountability, and more time spent solving customer issues instead of battling manual processes. These advancements pave the way for long-term operational success.
With the right governance and oversight, no-code automation provides a solid, scalable foundation for effective case management.
FAQs
How do no-code workflows streamline case management?
No-code workflows simplify case management by automating routine tasks, cutting down on manual work, and standardizing processes. This not only minimizes errors but also accelerates task completion and keeps your team on the same page with real-time updates.
With tools like nFlow, you can go even further by transforming your Salesforce playbooks into fully functional Teams workspaces. Each case room is automatically organized with the appropriate structure, content, and checklists, boosting teamwork and ensuring smoother execution.
What are the main advantages of using nFlow to connect Salesforce and Microsoft Teams?
Integrating Salesforce with Microsoft Teams through nFlow makes collaboration smoother by automating the creation and updates of Teams workspaces based on Salesforce activities. These workspaces come pre-organized with the necessary files, tasks, and checklists, helping your team stay aligned and consistent.
With real-time notifications and the ability to link Salesforce records directly as workspace tabs, nFlow minimizes manual tasks, boosts data accuracy, and speeds up workflows. The result? Improved teamwork, higher productivity, and streamlined case management.
What Salesforce fields should I use to trigger automated workflows?
To kick off automated workflows, zero in on fields that match important business conditions like status updates, key dates, or specific value limits. These fields serve as triggers in your workflow rules or flows, ensuring automation springs into action when significant events take place.
For instance, you could use a case’s status field to automatically create a new Teams workspace or set a date field to launch follow-up tasks. Pinpointing these trigger fields helps ensure your workflows run smoothly and stay in sync with your business operations.
Leave a Reply