

Deal rooms are specialized Microsoft Teams workspaces linked to Salesforce records like opportunities, accounts, or cases. These spaces centralize collaboration, integrating essential tools like private channels, task boards, and Salesforce data. By automating deal room setup with tools like nFlow, teams save time, reduce errors, and maintain consistency.
Key Points:
- Purpose: Streamline collaboration for sales teams by connecting Salesforce and Teams.
- Automation: nFlow automatically creates deal rooms when Salesforce triggers (e.g., opportunity stage) are met.
- Setup Requirements: Salesforce Lightning Experience, Office 365 account, and the Salesforce app for Teams.
- Manual vs. Automated: Manual setups are time-consuming and prone to errors, while automation ensures consistent, structured workspaces.
Next Steps: Install nFlow from the Teams app store, configure templates, and automate rules to align with your Salesforce data.
Prerequisites for Building Deal Rooms
Required Access and Tools
Before diving in, make sure you have the right access and tools in place. You’ll need administrative access and the appropriate licenses for Lightning Experience (Professional, Enterprise, or Unlimited editions) in Salesforce, as well as an Office 365 Work/School account for Teams.
Next, install the Salesforce app from Microsoft AppSource. This app allows you to search, share, and edit Salesforce records directly within Teams.
Once you’ve confirmed access and installed the necessary apps, you’re ready to set up the integration between Salesforce and Teams.
Setting Up Salesforce and Teams Integration
Start by enabling the Teams Integration feature in Salesforce Setup. Then, assign the User for Teams Integration Permission Set to the users who need access. On the Teams side, your administrator should add the Salesforce app to the relevant app permission policy.
After setting up the basic integration, the next step is to incorporate nFlow for automating deal room creation.
Installing and Configuring nFlow
nFlow simplifies the process of creating deal rooms by automating many of the manual steps involved.
To get started, install nFlow from the Teams app store. Create a base team with the necessary channels, files, and apps, and then use nFlow to save it as a template in the Templates Catalog. From there, navigate to the Integration Tab within nFlow, and log in with your Salesforce credentials to sync the two platforms. Note that only Office 365 Admins have the authority to manage this integration.
Once synced, set up automation rules by selecting the "Sync with a team" option and choosing your template. You can personalize naming conventions using dynamic rules – like pulling the Account name or Opportunity ID from Salesforce. Additionally, define specific triggers, such as automatically creating a team when an opportunity’s revenue surpasses a certain threshold or when an account belongs to a particular industry.
Manual Setup of Deal Rooms Using Native Tools
Creating a Team for a Salesforce Opportunity
You can manually set up deal rooms using the Sales app for Outlook or Salesforce’s Sales pane. To start, hover over the opportunity name, click "Set up deal room", and either create a new team or select an existing one. By default, the team name matches the opportunity name, but you can rename it as needed. Before finalizing, adjust privacy settings and invite colleagues. You can also customize channel names and privacy settings, including setting up shared channels for external collaboration (note: only team owners can create shared channels).
Adding Channels and Tabs
Once the team is created, you’ll need to add channels. Common choices include a General channel for internal discussions, an opportunity-specific channel, and a shared channel (e.g., "Customer – AccountName") for collaborating with external stakeholders. To integrate Salesforce records, head to the relevant Teams channel, click the "+" button, search for the Salesforce app, and pin the desired record – such as the opportunity or its related account. This allows team members to access and interact with Salesforce data directly in Teams. Additionally, you might want to add a Files tab with starter folders (like a CRM folder) and a Notes tab using OneNote for shared documentation.
Limitations of Manual Setup
Setting up deal rooms manually can be a tedious process, often leading to inconsistencies. Each opportunity requires individual configuration, and tasks like adding members or setting up channels can be time-consuming and error-prone. This fragmented approach may push teams to rely on disconnected tools, such as separate note-taking apps, spreadsheets, or other messaging platforms. As a result, Salesforce may no longer function as the central source of truth.
For a more efficient and consistent process, consider automating deal room creation with nFlow.
Automating Deal Room Creation with nFlow
Creating Playbook Templates in nFlow
To get started, set up a master team in Microsoft Teams that mirrors your ideal deal room layout. Include channels for internal discussions, customer collaboration, and specific topics like legal reviews. Organize your files – such as sales guidelines, execution playbooks, and contract templates – into clearly labeled folders. Add a Planner tab to outline sales tasks and integrate any tools or SharePoint sites your team relies on daily. Don’t forget to configure governance settings, like permanent membership and privacy rules, to ensure consistency.
Once your master team setup is complete, use the nFlow app from the Microsoft Teams app store to save it as a template. This template will be added to your organization’s Templates Catalog, so every deal room created follows the same format and includes the same resources, tools, and guidelines. Then, set up automation rules to automatically deploy this template whenever specific Salesforce criteria are met.
Configuring Automation Rules
In the nFlow app, head to the Integration Tab and choose Salesforce. Log in with your Salesforce account (Office 365 Admin access is required), then select "Sync with a team" to connect Salesforce events to the creation of deal rooms.
Pick the relevant template from your catalog, like your "Sales Deal Room template", and set up dynamic naming to include key Salesforce fields. For instance, you can pull in details like the opportunity name, account ID, expected revenue, close date, and owner information.
Next, define triggers based on Salesforce data. For example, you can configure a deal room to automatically generate when an opportunity exceeds a certain value or reaches the "Qualified" stage. Alternatively, you can set nFlow to add specific channels to an existing account team. For lifecycle management, create rules to archive or delete teams once opportunities close or are marked as lost, keeping your Teams environment tidy and organized.
Maintaining Consistency and Efficiency
By automating deal room creation with nFlow, you ensure every deal room is built with the same structure, resources, and tools – eliminating the inconsistencies and delays that come with manual setup.
Each deal room created from your template includes the same channels, files, tasks, and integrated apps, no matter who initiates the process or when it happens. This standardization ensures your sales playbook is followed consistently across all deals, reducing errors and streamlining workflows.
The automation is scalable, whether you’re handling a handful of opportunities or managing hundreds. nFlow applies the same rules instantly, without relying on specific team members or causing delays. This leads to faster follow-ups, fair task assignments, and complete visibility into every deal room’s structure – all while keeping Salesforce as your single source of truth.
sbb-itb-95f1422
Deal Room with Microsoft Teams and Salesforce

Best Practices for Managing Deal Rooms
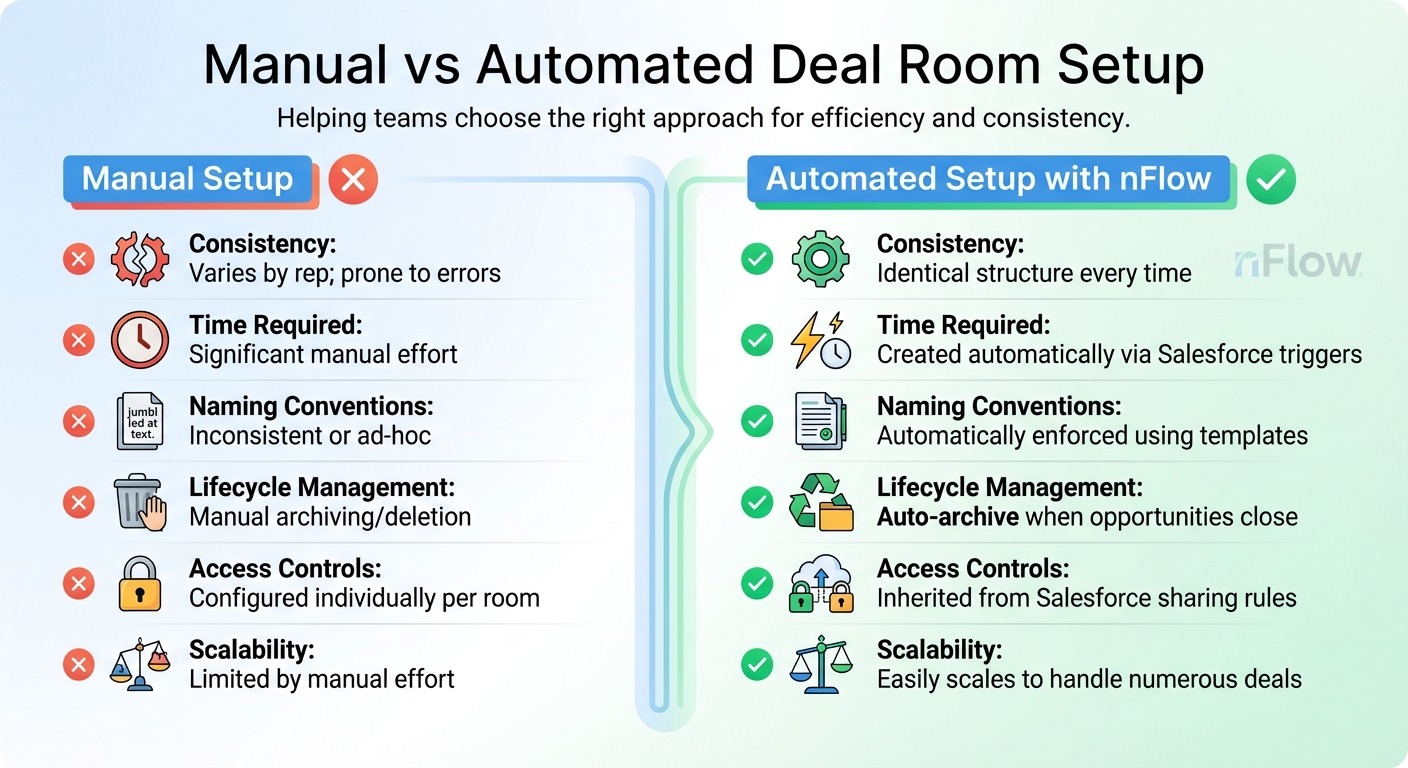
Manual vs Automated Deal Room Setup Comparison
Standardizing Naming and Lifecycle Policies
nFlow simplifies deal room management by automatically generating team names using Salesforce fields. This ensures consistent and error-free naming, making it easier to locate deal rooms quickly and avoid unnecessary confusion.
To keep things organized, establish clear rules for when deal rooms should be archived or deleted. nFlow enforces these triggers automatically, ensuring your system stays clutter-free. Document these guidelines in a shared handbook or repository so everyone is on the same page and can handle exceptions consistently.
Setting Up Access Controls
Once naming conventions are standardized, the next step is securing your deal room data with strong access controls. Align permissions with Salesforce sharing rules and role hierarchies to ensure access levels match your CRM setup. For example, account executives might have full access to their deal rooms, while team members like sales engineers or legal staff are added only when necessary, depending on the opportunity’s stage or deal size.
nFlow integrates seamlessly with Microsoft 365 governance, applying your Salesforce sharing rules directly in Teams. By configuring role-based access within Salesforce using tools like Profiles, Permission Sets, and Opportunity Teams, nFlow automatically carries these permissions over to Teams, saving time and ensuring consistency.
Manual vs. Automated Approaches
Comparing manual processes to automation highlights the clear advantages of nFlow. Manual setups often lead to inconsistencies, delays, and errors. Creating and configuring deal rooms manually can result in uneven structures, missing resources, and underutilized CRM data.
With nFlow’s automation, these challenges disappear. Each deal room is created using a standard template that comes pre-loaded with channels, files, tasks, and other essential resources. Naming conventions are applied automatically, lifecycle policies are triggered without manual input, and access controls align perfectly with your Salesforce configuration from the start.
Here’s a quick comparison of manual versus automated setups:
| Aspect | Manual Setup | Automated Setup (nFlow) |
|---|---|---|
| Consistency | Varies by rep; prone to errors | Identical structure every time |
| Time Required | Significant manual effort | Created automatically via Salesforce triggers |
| Naming Conventions | Inconsistent or ad-hoc | Automatically enforced using templates |
| Lifecycle Management | Manual archiving/deletion | Auto-archive when opportunities close |
| Access Controls | Configured individually per room | Inherited from Salesforce sharing rules |
| Scalability | Limited by manual effort | Easily scales to handle numerous deals |
Conclusion
Key Takeaways
Automating the creation of deal rooms in Microsoft Teams from Salesforce is a game-changer. Relying on manual setups not only consumes time but also increases the risk of errors and inconsistencies as the number of deals grows. The real difference lies in moving from simple connectivity to full operational automation.
Manual setups require substantial effort and often lead to structural discrepancies. In contrast, automated solutions like nFlow apply your predefined playbook seamlessly – ensuring every deal room is equipped with the same channels, files, tasks, and access controls right from the start, all triggered by Salesforce events.
The most effective strategy for deal rooms combines three crucial elements: consistent naming conventions to make workspaces easy to locate, lifecycle policies that automatically archive closed opportunities, and access controls aligned with Salesforce sharing rules. When these elements are integrated through automation, sales teams can focus on what matters most – closing deals – while eliminating the hassle of managing workspaces. Research shows that automating CRM processes significantly boosts productivity and enhances customer service by cutting down on manual work and speeding up handoffs and approvals.
This reinforces the overarching goal: using nFlow to transform Salesforce-driven playbooks into streamlined, standardized Teams workspaces. The next step? Putting this into action.
Next Steps
Ready to streamline your workflow? Start by installing nFlow directly from the Salesforce AppExchange. The package, developed by Cyfuno Labs, includes a guided Setup Assistant that simplifies the configuration process for both Salesforce and Teams Administrators – no extra tools or dependencies required. As Adam Erstelle, Software Engineer at Cyfuno Labs, explains:
"The solution also includes a guided setup, which makes setup a breeze and allows you to start testing your use cases ASAP".
Take advantage of the 14-day free trial to explore automated deal rooms using real opportunities. Use the detailed guides and video tutorials to configure your first playbook template, set automation rules based on opportunity stages or deal amounts, and validate the system. Once you’re satisfied, roll it out to your entire sales team – automatically turning every Salesforce opportunity into a fully functional Teams workspace.
FAQs
How does nFlow simplify creating deal rooms in Microsoft Teams?
nFlow simplifies the process of setting up deal rooms in Microsoft Teams. Whenever a Salesforce opportunity or object meets your predefined criteria, nFlow automatically creates or connects the appropriate team and channels. These spaces come pre-loaded with folders, templates, tasks, and checklists based on your playbook, ensuring everything is organized right from the start.
To make collaboration even smoother, nFlow pins the relevant Salesforce record as a tab in the workspace. It also keeps your team in the loop with smart notifications directly in Teams. This automation allows sales and service teams to skip the hassle of manual setup and dive straight into execution, with every deal room structured and ready to go.
What do I need to set up Salesforce integration with Microsoft Teams?
To connect Salesforce with Microsoft Teams, you’ll need a Salesforce edition that supports API access and the appropriate permissions within Salesforce. On the Microsoft Teams side, ensure you have an existing environment with teams and channels already set up, along with the permissions required to add connectors and webhooks. Double-check that both platforms are configured correctly to enable smooth integration.
How do I maintain consistent naming and access controls in deal rooms?
To keep everything organized and consistent, adopt clear naming conventions for your deal rooms and channels that match your team’s workflows. Set up access controls based on roles and permissions, making sure only designated owners can create shared channels. It’s also a good idea to periodically review and adjust permissions as needed. Using templates can help streamline naming and access policies across all deal rooms, ensuring everyone stays on the same page.
Leave a Reply