

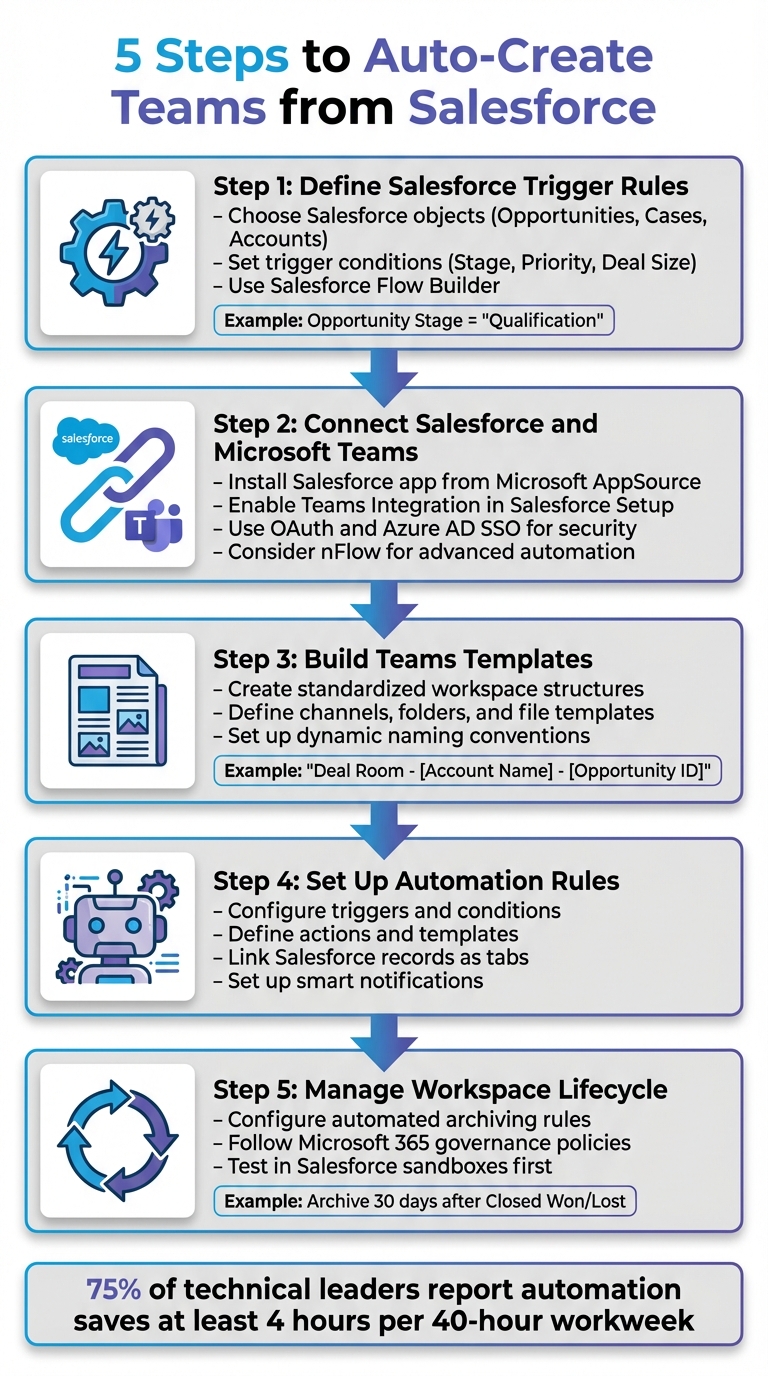
Managing workflows between Salesforce and Microsoft Teams can be tedious. Manually creating Teams workspaces for every Salesforce record wastes time and reduces efficiency. Automating this process eliminates repetitive tasks, ensures consistency, and helps teams focus on closing deals or resolving cases faster. Here’s how you can set up automation in five steps:
- Define Salesforce Trigger Rules: Specify which Salesforce records (e.g., Opportunities, Cases) and conditions (e.g., Opportunity Stage = "Qualification") will prompt workspace creation.
- Connect Salesforce and Microsoft Teams: Use Salesforce’s Teams integration or tools like nFlow for secure, automated connectivity.
- Build Teams Templates: Create standardized templates with predefined channels, folders, and tasks for each workspace type.
- Set Up Automation Rules: Automate workspace creation based on triggers, ensuring relevant records are linked and notifications are sent.
- Manage Workspace Lifecycles: Implement archiving rules to keep Teams organized and compliant with governance policies.
Automation tools like nFlow enhance Salesforce-Teams integration by enabling dynamic naming, playbook-based templates, and lifecycle management. This approach saves time, reduces errors, and improves collaboration.
Quick Comparison
| Feature | Native Integration | nFlow Integration |
|---|---|---|
| Workspace Creation | Manual | Automatic |
| Templates | Basic | Predefined with folders/tasks |
| Dynamic Naming | Not available | Supported |
| Conditional Triggers | Limited | Advanced |
| Lifecycle Management | Manual archiving | Automated archiving |
Automating Teams workspace creation from Salesforce records ensures your team spends less time on setup and more time on meaningful work.
5 Steps to Auto-Create Microsoft Teams from Salesforce Records
Integrating Microsoft Teams and Salesforce with No Code
Step 1: Define Your Salesforce Trigger Rules
Decide which Salesforce records will prompt the creation of Teams workspaces and when they should be generated. Setting up precise triggers ensures your sales or service processes run smoothly and collaboration happens right on time.
Choose Salesforce Objects and Trigger Conditions
Start by identifying the Salesforce objects that align with your workflow. These could include objects like Opportunities, Accounts, Cases, or even custom objects tailored to your operations. Next, define the conditions that will activate the trigger. For example, you might use criteria such as Opportunity Stage, Case Priority, or custom fields like Deal Size. Decide whether these triggers should activate when a record is created, updated, or both.
Let’s say your sales team wants a workspace created whenever an Opportunity reaches the "Qualification" stage. Meanwhile, your service team might need one set up when a Case is flagged as "High Priority." These rules ensure the right Teams workspace is created at the right moment.
To configure these rules, use Salesforce Flow Builder. It’s quicker and more adaptable than older tools like Workflow Rules or Process Builder. You can even add time-based conditions, such as setting up a follow-up workspace three days after a deal hits a specific stage.
Map Playbooks to Teams Structures
After defining your triggers, connect them to your Teams collaboration setup. Translate your operational playbooks into specific Teams elements like channels, folders, and tasks. For instance, a "Deal Room" playbook for high-value Opportunities could include channels like #general, #strategy, #legal-review, and #customer-comms, along with folders for contracts and proposal templates.
Using modular playbook components ensures every workspace is consistently structured with the same channels and resources. This consistency simplifies collaboration and reduces setup time. To keep things organized, document these mappings in a planning table.
Document Your Strategy in a Planning Table
Create a detailed table that links Salesforce objects, trigger conditions, and Teams templates. This step makes your setup clear, easy to manage, and simple to tweak as your needs evolve. Here’s an example of what such a table might look like:
| Salesforce Object | Trigger Condition | Teams Template | Lifecycle Rule |
|---|---|---|---|
| Opportunity | Stage = "Qualification" | Deal Room | Archive 30 days after Closed Won/Lost |
| Case | Priority = "High" | Case Room | Archive 60 days after Case Closed |
| Account | Region = "North America" AND Industry = "Healthcare" | Account Space | Keep active indefinitely |
This table will serve as your roadmap for the next steps, helping you stay organized as you move forward.
Step 2: Connect Salesforce and Microsoft Teams
After setting up your trigger rules, the next step is to establish a secure connection between Salesforce and Microsoft Teams. This connection allows data to flow seamlessly between the two platforms, forming the backbone of the workspace automation you’re building.
Setting Up the Salesforce–Teams Integration
Start by installing the Salesforce app from Microsoft AppSource. To proceed, you’ll need access to Salesforce Lightning Experience (Professional, Enterprise, or Unlimited license) and an Office 365 Work or School account.
In Salesforce Setup, enable the "Teams Integration" feature. Assign the User For Teams Integration Permission Set to those who will use the integration. Next, add the Salesforce app to the relevant Teams channels. The integration relies on OAuth and Azure AD Single Sign-On (SSO) for secure authentication.
When configuring integration users, security should be a top priority. Stick to the principle of least privilege by using a dedicated Salesforce Integration user with the "Minimum Access – API Only Integrations" profile. Limit access further with specific permission sets and defined Login IP Ranges.
"Using the System Administrator profile might seem like the easiest option, but granting full admin rights for integration purposes compromises security. In fact, there have been several times in my career when trying to work with vendors on least privilege access for the integration user where their answer is to give system admin access. WRONG!" – Jennifer W. Lee, Lead Admin Evangelist, Salesforce
Before deploying the integration to your production environment, always test it in a Salesforce sandbox. This step helps identify configuration issues early and ensures your security settings are properly implemented.
While the native integration offers basic functionality, tools like nFlow take automation to the next level.
How nFlow Enhances Native Integrations
The basic Salesforce app for Teams covers simple tasks like viewing records, pinning tabs, and sending notifications. However, it doesn’t handle more complex needs like automatically creating structured workspaces based on your playbooks.
This is where nFlow comes in. It builds on the native integration by introducing playbook-based automation. For instance, when a Salesforce record meets your trigger conditions, nFlow can automatically create a fully configured Teams workspace. This workspace includes predefined channels, file templates, tasks, and lists, with the associated Salesforce record pinned as a tab. Real-time notifications are also sent – no manual setup required.
"With Salesforce and Microsoft Teams advanced integration, you can automatically create a pre-built workspace for each Salesforce record. This way, your team members can easily collaborate on your key accounts and opportunities without the need to juggle between platforms." – Alexandre Cipriani, nBold
nFlow also offers dynamic naming capabilities, pulling data such as Account Name, Opportunity ID, or Owner directly from Salesforce records into team names and descriptions. You can even set conditional rules to generate workspaces only when specific criteria are met, like when an account’s revenue exceeds $100,000 or a case’s priority is marked "High." This approach minimizes unnecessary Teams sprawl while ensuring critical records get the attention they deserve.
Once you’ve integrated Salesforce and Teams and added automation through nFlow, you can move on to tailoring Teams templates to align with your Salesforce playbooks.
Comparison Table: Native Integration vs. nFlow
Here’s a quick breakdown of how the native integration compares to nFlow’s expanded features:
| Capability | Native Salesforce–Teams Integration | nFlow |
|---|---|---|
| Basic Connectivity | View and edit records, pin tabs, and notifications | All of the above, plus automated workspace creation |
| Auto-Creation | Manual team/channel creation required | Automatically creates teams and channels from Salesforce records |
| Playbook Templates | No template support | Pre-configured channels, folders, file templates, tasks, and lists |
| Dynamic Naming | Static names only | Dynamic naming using Salesforce record data |
| Conditional Automation | Not available | Creates workspaces only when specific Salesforce criteria are met |
| Lifecycle Management | Manual archiving or deletion | Automatic archiving when Salesforce records close or are deleted |
| Setup Complexity | Simple, quick installation | Requires template configuration and rule definition |
Step 3: Build Teams Templates from Your Playbooks
After connecting Salesforce and Teams, the next step is turning your playbooks into standardized Teams templates. This ensures that every workspace – whether it’s a deal room, account space, or case room – starts with the same structure, content, and resources right from the start.
Set Up Teams Templates and Naming Rules
Start by defining the ideal structure for each type of workspace. For example:
- A deal room might include channels like Discovery, Proposal, Legal & Security, and Implementation.
- A case room could have channels such as Triage, Resolution, and Customer Communication.
Each channel can also include a predefined folder structure and file templates to keep everything organized.
To maintain consistency, use dynamic naming conventions. For instance:
- Deal Room – [Account Name] – [Opportunity ID]
- Case – [Case Number] – [Priority]
This approach makes workspaces instantly recognizable and helps keep Teams well-organized, even as your automation scales.
Configure Templates in nFlow
With nFlow, setting up templates becomes straightforward. Using its visual interface, you can create Teams templates based on your playbooks. Simply define the template once – specifying channels, folders, file templates, tasks, and lists – and nFlow will automatically apply it whenever a Salesforce record meets your trigger conditions.
When setting up templates in nFlow, assign ownership to teams like Sales Ops or Customer Success Ops. This ensures that updates to playbook structures can be made without needing IT support for every change. You can also create conditional rules to apply different templates depending on Salesforce data. For example:
- Use an enterprise deal room template if an opportunity exceeds $50,000.
- Apply a high-priority case room template when a case is marked as "High Priority."
To keep everything clear and easy to manage, document these configurations in a mapping table.
Create a Template Mapping Table
A mapping table links Salesforce objects and conditions to their corresponding Teams templates. This table serves as the foundation for your automation logic, making it transparent and easy to maintain.
| Salesforce Object | Stage/Condition | Teams Template | Channels Included | Pre-Loaded Content |
|---|---|---|---|---|
| Opportunity | Stage = Qualification, Amount > $50,000 | Enterprise Deal Room | Discovery, Proposal, Legal & Security, Implementation | Proposal template, mutual action plan, QBR deck |
| Opportunity | Stage = Qualification, Amount ≤ $50,000 | Standard Deal Room | Discovery, Proposal | Proposal template, pricing calculator |
| Case | Priority = High | High-Priority Case Room | Triage, Resolution, Customer Communication | Escalation checklist, response templates |
| Account | Type = Strategic | Strategic Account Space | Planning, QBRs, Executive Engagement | Account plan template, success metrics dashboard |
This table becomes your single source of truth for automating templates. As your playbooks evolve, you can update the table and adjust your nFlow settings to ensure that Teams workspaces always align with your latest processes and best practices.
sbb-itb-95f1422
Step 4: Set Up Automation Rules
Now that your templates are ready, it’s time to use nFlow to automate the creation of Teams workspaces based on specific Salesforce events. This step involves deciding when a workspace should be created and ensuring it’s properly linked to relevant Salesforce records.
Configure Automation Rules in nFlow
With your templates standardized, the next step is to automate their deployment. Using nFlow’s visual builder, you can create automation rules without any coding. Here’s how it works: you define the trigger (the Salesforce event), set the conditions (which records are eligible), and specify the action (what nFlow should do in Teams).
For example, you can trigger workspace creation when an Opportunity reaches a qualifying stage or when a Case is flagged as high priority. To avoid clutter, set conditions so workspaces are only created for relevant records. Refer back to the planning table from Step 1 to align with your predefined triggers. Common triggers might include updates like deal amounts exceeding $50,000 or SLA deadlines nearing.
Once your trigger is set, define the Teams template to be used, along with naming conventions and access permissions. nFlow then takes care of the rest: creating the team, setting up channels, loading folders and file templates, and pinning the Salesforce record as a tab for easy access.
Link Salesforce Records and Send Notifications
nFlow automatically pins the associated Salesforce record as a tab in the workspace, making it instantly accessible to your team.
But automation doesn’t stop at workspace creation. Smart notifications ensure your team stays updated as records evolve. For example, if a deal progresses to the "Negotiation" stage, nFlow can post an update in the deal room’s main channel to keep everyone informed. Similarly, if a case is escalated or an SLA is close to breach, an alert can be sent to the support channel, helping your team respond faster.
You can configure notifications to trigger based on stage changes, field updates, or thresholds being met. This ensures that vital Salesforce updates are delivered directly to the workspace where your team is already collaborating.
Document Rules in a Definition Table
As your automation setup grows, keeping track of your rules is crucial. A rule definition table acts as a central reference point, making it easier to audit, update, and troubleshoot your automation logic.
| Rule Name | Salesforce Object | Trigger Condition | Action | Notifications | Lifecycle |
|---|---|---|---|---|---|
| Enterprise Deal Room | Opportunity | Stage = Qualification, Amount > $50,000 | Create Enterprise Deal Room template | Notify channel when stage changes to Negotiation or Closed Won | Archive 30 days after Close Date |
| Standard Deal Room | Opportunity | Stage = Qualification, Amount ≤ $50,000 | Create Standard Deal Room template | Notify channel when stage changes to Proposal | Archive 30 days after Close Date |
| High-Priority Case | Case | Priority = High or Critical | Create High-Priority Case Room template | Notify channel when SLA < 2 hours or Status = Escalated | Archive 7 days after Case Closed |
| Strategic Account Space | Account | Type = Strategic, Annual Revenue > $500,000 | Create Strategic Account Space template | Notify channel on QBR date or renewal milestone | Keep active indefinitely |
This table serves as your go-to resource for managing automation. Whether you’re onboarding a new team member or adjusting your rules, it provides a clear overview of what’s configured. Before making changes live, always test them in a Salesforce sandbox to confirm everything works as intended. These documented rules lay the groundwork for managing workspace lifecycles effectively in the next steps.
Step 5: Manage Workspace Lifecycle and Governance
Once you’ve automated the creation and updates of workspaces, the next step is overseeing their lifecycle to ensure everything stays organized and compliant.
Configure Archiving Rules
nFlow simplifies archiving by automatically triggering actions when Salesforce records reach their final state. For example, when an Opportunity is closed or deleted in Salesforce, nFlow can archive the related deal room in Teams. Similarly, if a Case is resolved, the corresponding case room can be retired after a set period – like seven days post-closure.
You can customize these archiving triggers by linking specific Salesforce events (like record deletion or status updates) to actions in nFlow. Use the rule definitions you created in Step 4 to align archiving policies with each workspace type. For instance, enterprise deal rooms might remain active for 30 days after closure, while high-priority case rooms could be archived within a week.
Follow Microsoft 365 Governance Policies
nFlow works seamlessly within your existing Microsoft 365 governance framework. It adheres to the naming conventions, access controls, and retention policies already established in your tenant. By integrating with these pre-set rules, nFlow ensures that workspaces created through automation meet the same standards as manually created ones. This means you can maintain consistency and compliance without adding unnecessary complexity.
Test in Salesforce Sandboxes First
Before rolling out lifecycle rules, test them in a Salesforce sandbox. Sandboxes are isolated environments that mirror your production setup, making them perfect for validating automation logic without risking live data or disrupting users.
For the most accurate testing, use a Full Copy sandbox. This type of sandbox replicates your production data and metadata, providing a reliable environment to catch errors and resolve conflicts before deploying to production. Testing in a Full Copy sandbox ensures your automation runs smoothly and integrates correctly with tools like nFlow.
Conclusion: Automate Teams Creation with Salesforce
nFlow takes the hassle out of workspace creation by automating everything – from defining triggers to executing detailed playbook templates. When a new opportunity enters your pipeline or a case is opened, nFlow seamlessly sets up and configures Microsoft Teams workspaces for each Salesforce opportunity or case. These workspaces come preloaded with all the necessary playbook content, tasks, and even a pinned Salesforce record for quick access.
This level of automation doesn’t just make life easier – it delivers measurable time savings. For instance, nearly 75% of technical leaders report that automation saves at least four hours in a typical 40-hour workweek. Take RecruitMilitary as an example: they slashed their event registration process from 30 minutes to just 30 seconds per exhibitor, saving over 4,000 hours annually. Similarly, RBC Wealth Management-U.S. reduced their client onboarding process from weeks down to an average of just 24 minutes.
By standardizing playbook execution, nFlow ensures every workspace follows a consistent structure, eliminating the risks of manual errors and guesswork. Plus, real-time Salesforce notifications keep teams in sync without the need for constant updates or check-ins.
"Automating CRM workflows enables service teams to scale customer experiences, sales teams to spend more time building and maintaining deep customer relationships, and businesses to increase the speed of work across every department, including HR, IT, and finance." – John Kucera, SVP Product Management, Salesforce
FAQs
What makes nFlow better than built-in Salesforce-Teams integration?
nFlow takes Salesforce-Teams integration to the next level by automating the setup and management of Teams workspaces directly from Salesforce records. Unlike built-in options, nFlow ensures that every workspace is set up with everything you need – folders, file templates, tasks, and lists – straight from your playbook. This not only saves time but also guarantees consistency across your workflows.
Additionally, nFlow pins the related Salesforce record as a tab within the workspace, making it easy to access key information. It also keeps your team in the loop with smart notifications in Teams. By transforming your sales and service playbooks into fully functional, ready-to-go workspaces, nFlow simplifies collaboration and execution without adding unnecessary steps.
What are the benefits of automating Teams workspaces with Salesforce?
Automating Teams workspaces with Salesforce takes teamwork to the next level by instantly linking your team to the resources, data, and updates they need. Instead of spending time on manual setup, every workspace is automatically organized with the right channels, files, and tasks based on your workflows.
This approach not only saves time but also minimizes errors and ensures everyone stays on the same page. By directly connecting Salesforce records to Teams, communication becomes smoother, allowing sales and service teams to focus on what truly matters – getting the job done, not managing tools.
How can I maintain compliance and governance when automating Teams workspaces with nFlow?
To maintain compliance and proper governance while using nFlow, start by setting up strong data governance policies. Take advantage of Salesforce’s built-in tools, such as role-based access controls and audit trails, to manage permissions and keep track of activities. Additionally, use encryption and monitoring features to safeguard sensitive information and monitor changes in real-time.
nFlow simplifies compliance by embedding it directly within your workflows. It automates the creation of workspaces based on your Salesforce rules, ensuring that structures and processes remain consistent. Plus, it works effortlessly with your Microsoft 365 governance policies, ensuring Teams workspaces align with company standards. This way, your sales and service teams can stay focused on their goals without worrying about compliance distractions.
Leave a Reply